Knitting Tips by Judy

Knitting Tips by Judy
|
|---|
| Celebrities |
|---|
| Getting Started |
| Yarns |
| Accessories |
| How To |
| Abbreviations |
Videos |
| Basic Stitches |
| More Tips |
| Books |
| Links |
| Charity Knitting |
| Patterns |
| About Me |
| Contact |
| HOME |
| Blog |
FOR SALE |
Snow Flake Pattern Graph
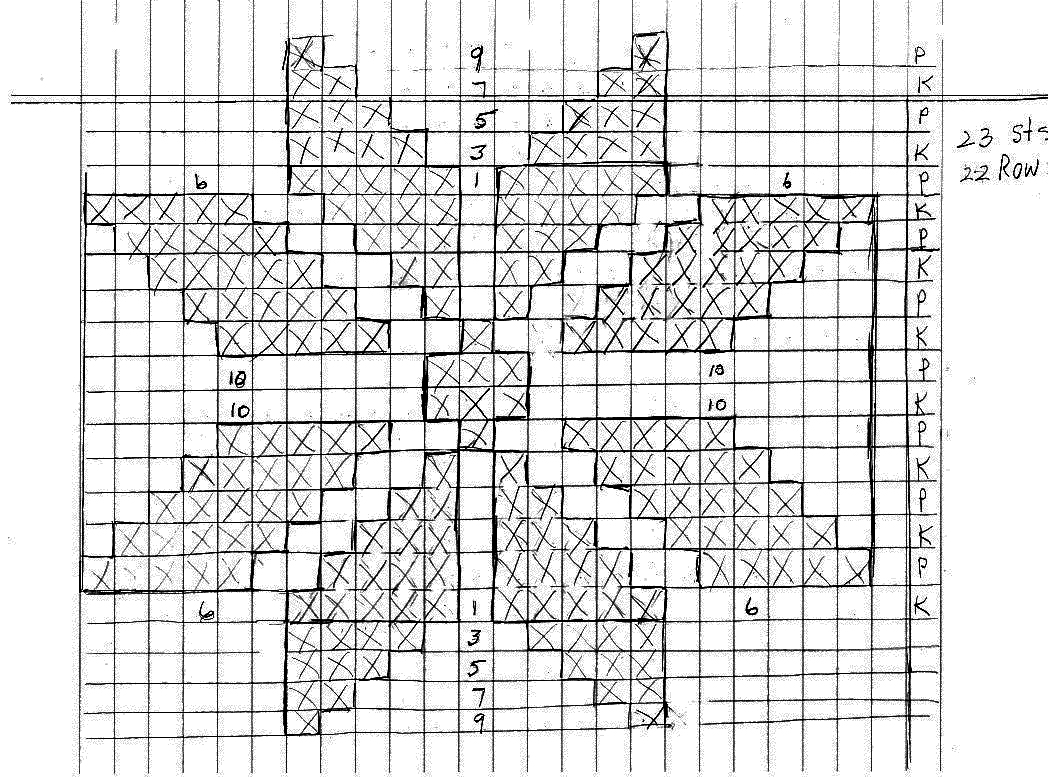
SNOWFLAKE INSTRUCTIONS
Cast on 23sts. Pattern is 22 rows. Start from the bottom.
1. K 6 green, 1 white, 9 green, 1 white, 6 green
2. P 6 green, 2 white, 7 green, 2 white, 6 green
3. K 6 green, 3 white, 5 green, 3 white, 6 green
4. P 6 green, 4 white, 3 green, 4 white, 6 green
5. K 6 green, 5 white, 1 green, 5 white, 6 green
6. P 5 white, 2 green, 4 white, 1 green, 4 white, 2 green, 5 white
7. K 1 green, 5 white, 2 green, 3 white, 1 green, 3 white, 2 green, 5 white, 1 green
8. P 2 green,5 white, 2 green, 2 white, 1 green, 2 white, 2 green, 5 white, 2 green
9. K 3 green, 5 white, 2 green, 1 white, 1 green, 1 white, 2 green, 5 white, 3 green
10. P 4 green, 5 white, 2 green, 1 white, 2 green, 5 white,
11. K 10 green, 3 white, 10 green
++++++++++++++++++++ half way+++++++++++++++++++++
12. P 10 green, 3 white, 10 green
13. K 4 green, 5 white, 2 green, 1 white, 2 green, 5 white, 4 green
14.P 3 green, 5 white, 2 green, 1 white, 1 green, 1 white, 2 green, 5 white, 3 green
15. K 2 green 5 white 2 green, 1 white, 2 green, 5 white, 2 green
16. P 1 green, 5 white, 2 green, 3 white, 1 green, 3 white, 2 green, 5 white, 1 green
17. K 5 white, 2 green, 4 white, 1 green, 4 white, 2 green, 5 white
18. P 6 green, 5 white, 1 green, 5 white, 6 green
19. K 6 green, 4 white, 3 green, 4 white, 6 green
20. P 6 green, 3 white, 5 green, 3 white, 6 green
21. K 6 green, 2 white, 7 green, 2 white, 6 green
22. P 6 green, 1 white, 9 green, 1 white, 6 green
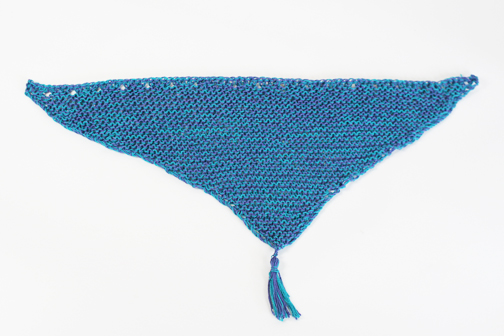
TRIANGLE SCARF W/YO (YARN OVER) INCREASES
I used 2 strands of thin mercerized cotton thread on a size 8 needle, but you can use any yarn you like and any size needles. See my video of how to make a triangle with YO increase.
Cast on 1 stitch
Next row K that stitch and increase in that stitch so you have 2 stitches.
Next row K those 2 stitches and increase so you have 3 stitches.
Now to start the YO increases:
Next row, and every row, Slip 1st stitch, *YO, K to the stitch BEFORE the last stitch, YO, K last stitch.
Continue knitting till the triangle is as big as you want it to be. (I made a small one which is good for a small person to wear around the neck or as a head scarf.)
Binding off:
To get a look that is similar to the edges See my video of YO bind off.
Slip first stitch, *K1, YO, K2 tog., K1, repeat from * all the way across.
TIP If you need the holes to be closer, skip the last K1 in between and just *K1, YO, K2 tog all the way across.
Finishing: You can leave it as it is and just weave the ends in at the bottom of the triangle and at the edge where you bound off OR you can add a tassel at the bottom edge. See my video How to Make a Tassel
Cut a piece of cardboard a little bigger than the size that you want the tassel to be. Wrap the yarn around the cardboard as many times as you want for the thickness of the tassel. Cut at one end. Put a piece of yarn at the middle and tie it tightly twice. Fold the tassel over and take a more yarn and wrap it around a little below the top to make a head. Tie that yarn tightly twice, cut it leaving it as long as the tassel and with a crochet hook pull it through to blend in with the other yarn in the tassel. Using the crochet hook again, pull the top yarn through the bottom of the triangle a few times, then under the wrapped part of the tassel so it will also blend in with the other yarn. When you’re done, trim any loose or longer yarns so the bottom of the tassel is even and there you have it.
TIP: If you want to make tassels for a straight edged scarf you will want several of them spaced evenly along the edges. Make them one at a time, tie the yarn around the middle and put them aside as you have assembled them thus far. Then do the wrapping, put them aside. When they are all done attach them.
PAGE 6